Friday, March 03, 2023

You need a good horn

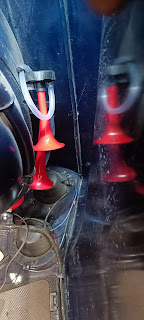
Christmas was good, my dear mum bought me a great present, a set of Fiamm airhorns, non-musical, just bloody loud.

On the Vitesse there's a few places to mount these but I like to have them up out of the weather on the top of the front arch. These were a new kit from Fiamm (the design hasn't changed much over the years) and come with wiring and a relay. We wired them into the usual horn circuit and they are sounded from the steering wheel in a conventional way. 


I've had cars with musical air horns and I don't mind saying I liked them, but now I prefer a simple twin tone to La Cucaracha!


Tuesday, February 28, 2023

Oil be able to service it now.

It's getting more difficult to think up titles to these posts and it's showing now with poor quality puns. Sorry (not sorry).

When I got the car, there were several things that were not quite finished, they were close but not quite there. The previous owner had a deadline to get the car ready for a show, he's a thorough guy and thinks things through, he's a designed and meticulous. But he's also human and is governed by the same rules of physics are the rest of us - we all run out of time!

One of the things that needed finishing was the oil filter arrangement. With the engine valance in place, there was no way you could secure the filter head and get at it to replace the filter. Impossible really, when I changed the oil, I ended up pulling the whole thing off and making a mess when I did it.


Here's what we came up with, moving things up front where there's a little more space. This meant remaking the hoses. We still needed a way to anchor it and make the filter accessible for servicing.


This was how James got around this - relocating the filter housing to the front of the engine bay and making a pocket in the engine valance to sit it in. The filter is now on the outside of the valance.

It needed a secure mounting and so James made a small 'hump' to take the filter head.

The whole valance has been painted in body colour and refitted. 


Monday, February 27, 2023

Injecting, the remedy

Well, it worked, sort of, well not really but.....


OK let's go through it - O rings in the inlet manifolds. 

This didn't go well, the O rings, despite being heat and fuel resistant Viton material, deformed. The machining came close to the edge of the manifold and we lost a bit, it sort of blew out. It was a bit think before but now, it's gone.


We were aware of how close the groove had been machined initially and were almost expecting this. The O ring failure however was unexpected. I've researched other materials and I did find some that would work but at over £100 per O ring I just didn't feel we should go on. 

All in all, a bit of an expensive fail but I hope we've come out the other side with a decent result.

So, plan B - return the manifolds to flush fitting with some suitable epoxy metal and use a conventional gasket, maybe with some high temp RTV to ensure a full and durable seal.


The reason that we took the inlets off was not to examine these O rings, they were doing OK. No, it was to drop the exhaust manifold in order to weld in a boss for a lambda probe. The idea being that we'll add an AFR gauge. If we also add in a vacuum gauge then together with the existing fuel pressure gauge we have enough data to effectively tune the PI on the road. This car is being built to go up mountains - more on that in later blogs :-)


Because the exhaust is mild steel and been on there for 25+ years, it's pretty well stuck on there. I decided that it was not worth the risk of damage to pull it completely off. James said he could weld the boss by dropping the exhaust but not fully removing it. So that's what's been done - it was still too tight to get a welding mask on whilst doing the welding! He did a decent job despite some difficult conditions.

I now need to try and find a suitable AFR gauge, a vacuum gauge and a place to put them. The current pair of SPA digital gauges are really nice but there's no real space there to slip another one in without some major surgery. 


Might have to go into the dash 😮


So, does it all run OK now? Dunno yet! 


Saturday, February 25, 2023

A warm injection

Before I go through this it's important to say that none of what we found on the car and I've described below is to be regarded as a criticism - this car was built using some top notch components and to a high standard. The thought and thoroughness that's gone into it is amazing. Not everything is perfect and it's not all to my taste but, and here's the key, it wasn't built for me, or you. I will keep a lot of what's been done, I will change some of it and I will doubtless have to do some re-engineering to make it work. I may even find that some of it just won't work but I'll cross that bridge when I come to it and I'll enjoy the ride. 

Many issues are down to the effects of  years of standing and whilst I didn't do the work I'm writing about, I've done it before on other cars - I seem to be drawn to cars that have been stood for years, or stored for years, or just not used, this is the fourth Triumph I've had with a ling history of standing!

This time round I had James Cooper wielding the spanners - I've known James for years and he'd done some work on my yellow TR6 when I was travelling and needed to get it in shape for an event. I'm in a similar situation at the moment and as I can earn it faster than I can spend it with James, he's got the job. I'm really glad we went this way, James' day job is fixing aircraft so it's fair to say, he's got some skills :-)

Lucas PI is a thing of beauty but it's a tricky thing to get right. Now I don't profess to be an expert but I do like to think of myself as tenacious so I was determined to keep the PI on the Vitesse and get it working. For a car that had stood for many years with fuel in the system, this was always going to be a tricky one but, challenge accepted :-)

When the car was running, it had eaten at least two cam shafts, the previous owner had driven the car to Stafford and the TSSC annual event there. The trip up was not without its mishaps but the car had won an award there. Unfortunately, on the way back to Exeter, the car developed a misfire - symptoms that were the same at the previous camshaft issues. Those turned out to be poor materials and/or overly strong valve springs that cause premature wear. Fearing this was another camshaft, the previous owner put the car away, a little annoyed with it I suspect. He fully intended to have at it again and didn't intend for it to be laid up for so long. Of course, life got in the way, then work, then marriage, then children and several other projects - you get the picture. No judgement, we've all been there. 

So along I come and whilst the story of me becoming aware of the car and buying it is a multi year odyssey, I'll just say for now that I acquired the car as a non-runner, with an undisclosed engine issue, that could be something cam shaft related OR it might not.

First order of business as far as mechanics was concerned was to get the engine running and see what issues we could find. I was prepared for it to be another camshaft and something deep in the engine. I was also prepared for it to be a PI problem or indeed, something else. Spoiler, at the time of writing we think we've identified and fixed it BUT we haven't yet done the work to test that theory.

Fresh oil, fresh coolant, lubricating and freeing off a few parts plus some nice new injectors, replumbing the fuel pump and some new hose - some old hose was petrified and crunchy - and the engine was running. Sort of.

Above was the prototype temp fuel pump mount - a proof of concept if you like.

This was one of our trials 

It was clear that the link pipe need a bit of work, OK a bit of replacement

Diaphragm type PRV came with the car, the original Lucas type had proved unsuitable with the 044 pump.

Spotted a rather thin necked pipe, replaced with a new one to ensure there was no restriction.


This is the dirt shield to cover the pump and filter and offer some protection form the elements. I'm prepared for this to promote heat retention and need modifying. We'll see. This has now been painted and is not really visible from the road.

Here ares some of the issues you have to contend with when a car's been standing for years, 

Fuel injectors don't like old fuel, this should be shiny and clean. The O rings are hard and brittle.

This is what was in the fuel - this was, we suspect, the remnant of the fuel level sender, that had almost dissolved.

These bits play havoc with the injectors

This was what was in the metering unit and the fuel lines, the tank had been drained and cleaned out by the previous owner,

I've done a few and learned that there's no short cuts - replace all rubbers and trust nothing, drain the fuel and throw it away, change filters and flush everything.

It was fluffy, revs were rising and falling on tick over. Covering the air bleed did not kill the engine - we had an air leak. Well, to be precise, we had many air leaks. 

The intakes were running without gaskets, each of the three intakes had been machined to accept O rings like a Weber twin choke carb. 

Note no gasket on the inlets, the usual combined inlet and exhaust gasket has been trimmed away to leave just the head face to mate directly to the inlets.
Those O rings had not faired well, this was the best set!

I decided not to take the easy way and fill the machines grooves with chemical metal and stick a conventional gasket on it but it was clear that the machining wasn't quite right. A straight edge and some measuring confirmed the face of the inlets wasn't flat and the grooves were not 100% uniform depth. These inlets a bugger to clamp for machining and we had to try a couple of machinists before we found one who was capable and prepared to do it.

Sorry, couldn't figure out how to arrange these pics better but you get the idea.

So with the inlets back together and bolted on, we were ready for a start again.
Better, bit still not right.
Back to the air leak theory and we found that the throttle shafts were fine, no wear so that wasn't where the air was getting in. Some head scratching and we turned attention to the injectors - pulling them out had left the insulators in the manifold but pulling the insulators revealed the O rings were hard and brittle, time for new ones.

All this has taken time and the final run revealed we had improved things but it still wasn't right. During this work we'd swapped out the whole ignition system to rule out issues there and so we ended up swapping out the whole injection metering unit with James' TR6. And there we had it, she runs and despite over fuelling, there was smooth running and response, no fluffy stuttering pick up. SO, a metering unit overhaul was required.

We sent the 2 litre PI metering unit up to Neil Ferguson for a fettling and to get some spares, James had a couple of MUs in the queue with Neil and he turned it all round for us in quick time.

And that's where the story pauses, on a cliff hanger - did it work, have we cracked it? 

Dunno, I'll let you know.


Friday, February 24, 2023

Tanks for the memories

The fuel tank had been a bit of an issue - a lovely stainless bespoke handmade item. It had been fitted over an enlarged spare wheel well (with a suitably extended rear valance) but it didn't quite measure up. The full size spare wouldn't fit. OK, easy enough, just choc it up a bit, expect the hold down straps would no longer be long enough. No problem, extend those. Now once raised up the outlet pipe isn't in the right place, the hole in the body doesn't line up. No problem, cut a new one and remake the connections. Oh, now the tank isn't supported evenly. We decided on a thick base board, painted in POR15 to support the tank and give a stable base to sit the tank on. The whole lot is strapped down with steel straps bolted through the body. All this was not before the amplified for the ICE was slightly relocated :-)
The battery box was a similar story. The original fibreglass box needed some support to provide a stable base. The same baseboard was used and after adjusting the terminals we had a safe and stable battery with a supported and well anchored fuel tank that allows a full sized spare to be carried.

Test fitting to get the height right, as you can see, it's a centre fill tank. What you can't see is that there's a rather neat Triumph motorbike filler cap Frenched in and flush with the rear deck top

Some high density foam to sit the tank on, cut to fit around the spare wheel well.

More trial fitting to get the foam into the right shape.

Of course, changing the depth meant that the straps were not only too short now but also needed the mounting holes adjusting.


Pre-painting and it's all looking better, I will make some more boot boards when I have the car back. It could be quite a tidy place.

Battery box is an awkward fit on the uneven boot floor but we got it sorted.


Thursday, February 23, 2023

Tyred and emotional

 I'm not sure why but I always find getting tyres fitted to be a chore and often a stressful chore. This was no exception, even though I wasn't there and this was all done for me, it was a pain.

This time, the choice of rubber was fairly easy, I'd had Toyo Proxy tyres on my previous Vitesse and the 2.5PI. I tried to get them on the TR6 but couldn't source them. This time round I decided on Rain Experts by Uniroyal. Several friends have them on their Triumph and I've driven on them and been impressed. SO that was the easy part. 

Now where to get them? Well Halfords of all places had them on offer and so 5 were ordered and the wheels dropped off for fitting. Specific instructions were given that they should no load up weights without optimising the tyres on the rims first - I hate it when the fitter just slaps the tyre on and tells you "It's your wheels mate" even when they are brand new (been there before).

Well the Halfords fitter was not the greatest, or his equipment was crap, or he just could not be bothered but after a damaged tyre and a bucket of weights, he was done, this was the result.


This was not Halfords finest hour.

After some harsh words and a new tyre, on Halfords, the wheels were taken to an independent specialist who stripped off most of the weights, did the job properly and didn't wreck a tyre.

I should say that I have used Halfords locally on my modern car and been very impressed with their mobile fitters (if you're in Reading area, ask for get Courtney, he's a good bloke).

Tuesday, February 21, 2023

Ressurection by proxy

This last year has been an interesting one, those who've followed my blogs from the start will note that work has had a big influence on what I've been able to do with my Triumphs. This last year was no exception. I'll cur a long story short but in essence, I've become a contractor, to the firm I used to work for as a salaried employee. OK so it's not a huge deal but it does mean that the day rate is king and if I don't work I don't get paid - but when I do work, it's at a decent rate.

All this waffle translates to the fact that I can earn more working than I need to spend to have the Vitesse resurrected - Mrs C did the maths and pointed out that I should just get on with it or pay someone else to do so.

Finding someone wasn't that difficult, I've always been interested in workshops, how they run, how you turn a profit, who's trustworthy and does quality work and who isn't. I've got a lot of friends who work on cars in their spare time and are rather good at it. So I looked at who was good, well priced, I could trust and was available. Of course available is tricky because most good mechanics are in demand and booked up or semi-retired or just busy with their own cars.

Giving the car to someone else didn't come easy, it's been weird not having it here and even weirder discussing progress, diagnosing issues and working through problems remotely as the car went down to the south coast to a fellow Triumph fettler. He's not a full time car mechanic but he has several cars, has rebuilt a few and above all, is someone I trust.

The list was long and he's made some serious progress, it was never going to be a fast job, he has a day job, but we are nearing the end.

Remember, this car is very modified, lots of those mods were complete but some were not far past prototyping, so some didn't work and needed re-thinking, some did work and needed fully fitting and some were only ideas. The car had been off the road for circa 25 years which is always a challenge BUT the previous owner, Adam, is still interested and has been a great help - still is. I'm very grateful for his help.

Amongst the jobs were:

  • Get some new tyres on it!
  • Reconnect and complete the fuel system with an outboard pump mounted under the rear boot floor, panelled in with a dirt shield and plumber/wired in for easy servicing.
  • Remount the battery box and fuel tank with support underneath so that I could get a full size spare in the already enlarged spare wheel well.
  • Remount the wheel alloy arch extensions so that I didn't keep hurting myself when working on the engine - I wanted to make then removeable rather than rivetted in place.
  • Coolant change and bleed the brakes properly, 
  • Reposition the oil filter so it could be serviced - it's a remote mount and wasn't finished. Put some protection around the oil cooler as it's quite vulnerable to stone strikes.
  • Several "make it serviceable" jobs - stuff wasn't necessarily made to be be easily removed and serviced. Not a huge issue but now we can remove the radiator fan as it's attached with rivnuts and an electrical plug. We can get at the oil filter and when we make a mess, that will be easy to clean.
  • Get it running - assemble the PI system, go through the ignition and fuel system.
I've realised I've waffled on so here are a few pictures to break up the waffle

Oil Cooler a little vulnerable

Wheel arch extensions are great but get in my way when working on the engine. I wanted to make them easily removeable.

Externally mounted 044 type fuel pump. I've always been against this sort of pump but, I respect the process that brough the previous owner to the 044 and I'm going to give it a try. It needed a little protection from the elements and a permanent mounting. The previous owner was experimenting and had not finalised things here.

20+ years will do that to the guts of an injector. I will recondition these myself but in the meantime, a set of Neil Fergusons injectors are installed.

The coolant was clear and clean BUT this is what we found in the thermostat - the aluminium top hose seems to encourage formation of this goop.

OK enough for one blog, much of the work has been done and I intend to report on it here - if and when I have the time :-)


Sunday, April 10, 2022

Stop and go

Well the last 6 months didn't really go to plan. Too much work, away all week, and too much lethargy, cold garage and lack of mojo on my part. It's been too easy to stay inside, by the fire, in the warm. 
Life just gets in the way! 
I started planning to change my job last year and its all come together now. It's a bit of a subtle change and from the outside it's no change. I'm still working for the same firm but now on a contract basis. Paid differently, more flexibility and the option to work on other projects.
The other change has been that I decided to buy a flat closer to work so I can cut out the commute and stop living in a hotel, which after 6+ years gets a bit old. I'm keeping Chinn Towers in Reading, this flat will just be a weekday bas and hopefully I can see a bit more of Mrs C and the growing clan.

OK enough of the excuses, what all this means initially is that I've got a month off work and a load of jobs to do to prepare for moving into a flat as well as stuff around the house and the Vitesse! My original plan was to spend the month on it exclusively but being at the hands of solicitors means those plans are changing! I'm still aiming to get it running by the start of May.

So, to the brakes - what a pain and a steep learning curve! I think I'm there now, three master cylinders rebuilt and everything reassembled, twice.

It's a tight fit to get the pedal box in the car, and it ain't easy to get at the nuts and bolts. I admit I swore a lot and walked away a couple of times. 
This week I got back on it. I think I've got it all working now but it'll need a road test, when I get the car running! Twin master cylinders are a challenge but do make bleeding interesting, I do need to figure out the balance settings but that'll be easier when I can drive it.  Although it all went together OK the first time, I had a sticky pedal, hence the second time. I'm still not convinced by the lack of an external return spring but I'm going to roll with it and see how it works when driving.

The other jobs done are:
An oil change. I wanted to see if there was any evidence of premature cam wear, any glitter in the oil, that may point to internal issues. You might remember that the car came to me with a history of cam issues. Well the oil was excellent, not the expected 4.5 litres but it was on the dipstick mark. I was expecting more because it's got an oil cooler and remote filter. Here's the sump plug, no detritus at all. no glitter in the oil and no fuel smells.


I also cut the Unipart GFE173 filter apart to see if there was any debris in there - I was looking for metal shavings and found none. I would have taken some photos but I have to admit, I got into a hell of a mess with all this and didn't want to get my (new) phone covered in oil!

One of the challenges of this car is the packaging of the modifications - sometimes a compromise had to be made - the filter assemble for instance  (below). It's hard up against the cut down engine bay valance and isn't fully mounted, you can't get your hand underneath it to unscrew the filter and the on;y thing keeping it upright is the stiffness of the pipes 


Now I know this wasn't the finished installation, so I'll have to figure out a wat to securely mount it or find something different that allows an oil service without having to take the filter head off the car and take it to the bench.

This resulted in more dribbled oil :-(


The gearbox oil change was easier, there's quite a lot of room around the gearbox - the cardboard tunnel is gone in favour of a set of alloy panels that form the shell of a console in the car. It looks like I should be able to unscrew a pane from the inside to get to the gearbox filler but I couldn't figure out how to do this without damage, and, to be honest, I'd make such a mess of the engine oil change that I thought I should keep my accidents away from the nice carpets! So I worked from the outside and underneath.

The magnetic drain came out like a Christmas tree, with a bit of chaff on it.


However, one smeared on a piece of paper, it was clear there were no big lumps and now teeth, although the solid piece at the bottom right of the page does look like a chip off a gear - it's small and I'm not going to worry about it.


If you're wondering what fluids I used, I'm trying Valvoline 20w 50 in the engine and an old favourite of mine, 75W90 (used to be called MT90) in the gearbox, again synthetic. I've used this in all my previous cars, expensive but good. I may refresh this or at least have a look at it early in view of the above, I have a few bottles in stock


And that was as far as I got before 'domestic duties' intervened.

Next of the list:
  • Flush the brake fluid through the rear circuit.
  • Drain and replace the diff oil.
  • Secure the battery - need to have a look at the boot mounted battery box, it makes the battery a tight fit (I can't actually get the battery to fit but it's the same as the one that the PO used so I am sure it will fit). The box needs more support, see below, might be woodworking time to make a temporary base for it.
  • Spin the engine over and get the new oil circulating - I am worried that I'll forget and when I start it up, I'll ruin something!
  • Get the dial gauge out and do some valve gear lift measuring.