Monday, July 27, 2009

Special Spanners

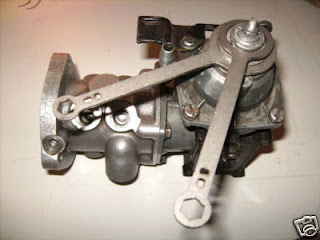
It's always bothered me that I've never seen the "right" tools to adjust a metering unit on a PI. The "Christmas tree" of nuts that adjusts fuelling at various throttle/vac positions is housed under the black or green (or Red) cone on the top of the MU - if you have a red one email me ;-) The nuts are weird different sizes, not conventional at all. I always thought it odd that no original tools ever surface for these nuts.
It's not the end of the world, you can get by easily without them but I always wanted the right tools or at least to know they existed!
Enter a nice chap who goes by the name of Hans-Peter Langenbach from Germany. He had the same idle thought as me but he decided to do something about it. He set about designing and manufacturing a set of suitable spanners.
He popped up on the Club Triumph Forum and asked if anyone was interested, I was and I now have a set. They do just what it says on the tin and fit just fine, might be a little tight but a light easing with a file is all that's needed. I admit I have not yet actually adjusted anything, one thing at a time, I'm still blueprinting, building and testing Lucas pumps! Hans-Peter has had a batch of these spanners made and is now selling on eBay, he needs to recoup his investment as he had to have quite a few made to make it cost effective. Click here for details http://shop.ebay.co.uk/merchant/hplangenbach or email Hans-Peter direct hplangenbach at yahoo dot de. He's a genuine guy and happy to help.

Sunday, July 26, 2009

Feeling righteous

Sunday was the day for Lucas PI remanufacturing. Over the last few months I've been doing some leg work to acquire the right bits and pieces to recondition a pump or two. I've been finding spares all over the place, at last count I was up to something like 7 pumps in my possession plus the one running on the car!

I've tested a few and many were crap - looking decent and serviceable on the outside doesn't mean they're any good at all on the inside. They all run and pump but a leak shaft seal (drips out of the tell tale) means they are useless unless worked on.

My new best mate, the friendly chappy at the local hydraulics place has been a real help - he sourced the big "O" rings that sit between the pump and the motor. It's the same ones in between the layers of the pump body. He also sourced the "O" rings for reconditioning Lucas injectors as I have run out of original Lucas ones. Trouble is, I had to have 50 - well guess who'll be buying up spare injectors and reconditioning them to make some money back?

The pump seals came from Canleys as did a set of brushes - these are the same as wiper motor brushes, same backplate but the wiper uses 3 brushes and the pump motor uses 2 - you can leave one in situ unused or take it off.

Most of the brushes in the pumps I've dismantled are OK, lots of life left in them but I thought I'd have a spare set in case I needed them.

The ultra sonic cleaner has been good, really gets the fine crap off - it's not as good as I'd like but I think I need to get better at rough cleaning first then use the ultrasonic to ensure it's clean for reasembly.

Getting the shaft seals out has so far been the worst job, I've ruined a cheap set of picks I bought - lasted about 5 minutes! So, back to the drawing board - if you can't buy a decent tool, make one. So I heated, bent and filed a screwdriver into a flat ended pick - it was great, did the job in a moment. I'm well pleased - funny how silly little things make you feel achievement!

Some silicon spray helped reassembly, careful not to just push it all together as the sharp end of the armature shaft can cut the new shaft seal rendering it useless.

I spent some time polishing the armature and making sure the segments were clean, that broken pick was useful for that!

Put it all back together and it works. OK it runs, sounds OK and doesn't burst into flames or even smell like burning.

Attention turned to the pump body, it's held together by roll pins and I was a bit worried about how to get it apart. Nick Jones sugested I just hold it in a vice and tap it apart with a soft hammer, I have to admit I was dubious it would as it seemed so solidly held together but it worked without drama. In fact I was able to wiggle it apart with my hands and after a little gentle levering it was apart.

The pump is a gear displacement pump, basically two simple gears running in a 3 layer sandwich. The top layer is the critical one and really the only part you can play with. If there are any scratches or wear in the plate then pump efficiency will be lost. Polishing the plate on a sheet of glass can take out some wear and reduce the gear end float thus regaining efficiency. So I've polished a couple and we'll see if they pump better when they go in the test rig (that I haven't really built yet!)

PRVs seemt to be in short supply, well they don't come up for sale very often, the last couple I've acquired have been attached to pumps or in with other PI kit. No matter, they are simple in operation although do seem to give a little trouble every now and again. I have a few and will select the best in the test rig.

There's lots more to do but now I have dismantled 3 pumps and rebuilt 2 I will turn to the test rig and see if I can set them up to run up to pressure. The next stage is to run them for a prolonged period, say 12 hours and check results.

Wednesday, July 15, 2009

It's weird what pops into your mind.....

I woke up this morning with an idea, well more the idea of a place to look for the solution - complicated I know. Here's the twisted tale. I have an agglometer in the PI, a fancy name for a glass bowl and drain tap in the fuel filter. The idea for this is that you can see if there's any water contamination and drain the fuel. It also has the added benefit of being an easy way to drain off a small amount of fuel for starting a BBQ in true boys own dangerous cookery style - but that's another story :-)

Anyway, as well as the agglometer thingy I have a clear injector line so I can see what's happening there too. The result of all this transparency is that you see things you never knew were happening - phenomena that you'd be blissfully unaware of if you had a standard system.

What could I see?

Bubbles!

No not the one time monkey partner of the deceased King of Pop but bubbles of air/vapour in the glass bowl and the injector pipe. These baffled me - the system was not leaking, it was not cavitating, these were appearing from start up and through out running up to temp (pump temp as well as engine temp). So where were these bubbles coming from? They were worrying as the PI system has no way of bleeding air out once fuel has flowed passed the PRV and then at pressures over about 30 PSI the PRV won't bleed air.

OK so to the point - I woke up this morning and thought "I know where the answer to that is" and I went straight to the article Dave Pearson gave me which emanated from I think a 1990 Club magazine (2000 register maybe?). I had blogged about this in the past. There it was, failing motor shaft seals on the pump unit will allow air in as well as leak fuel out.

Now I have tested loads of pumps and found failed shaft seals on about 60% of them - I haven't looked for air ingress just fuel egress (which is more obvious when bench testing). So it seems highly likely that I can sort this out with new seals.

The article also provides some good advice on blue printing a pump, what and how to modify as well as what to leave well alone!

As I write this, I think I'm going to have to work through this article and do the operations it suggests with camera in one hand and blog in the other.

Whilst the Lucas pump will always be the weakest link I am determined to build a good 'un and run the little bugger to success - I am actually enjoying this.

As soon as work, family and life generally allow me the time in the garage to get some momentum on this I'll be OK.

So far my local hydraulics place have let me down on the parts I ordered but my new best friend Darren at Pirtek Reading is on the case. Today's idle though - I wonder if they can supply injector O rings?

Here's the article, scanned and blogged, I commend it to all PI owners, I just wish I could credit the source properly:-


Jason's Blog: More Lucas PI info - some pearls of wisdom here :-)

Tuesday, July 14, 2009

Tyred and emotional

I'm a hoarder, I can't throw stuff away, it's a serious problem for me and although eBay has relieved me of a few things it's a double edged sword because for every thing I sell I seem to buy more replacements!
Anyway, Sunday was a good day, fellow Triumphist Nick Jones was in need of a hood frame for his Vitesse and yes, I had one, well two actually. They'd been up in the garage loft for a few years - one even had a 1970's white roof still attached. Anyway, an arrangement was made and Nick pitched up Sunday morning for excavations in the garage loft. I uncovered a spare wheel well for a Herald/Vitesse up there too (will be on eBay when I can find the camera). We managed to get the frames down and examined, they weren't as good as I remembered them but together they were good enough for Nick and beer tokens changed hands. Not one to hang around, Nick's already been at them with grinder and hacksaw to make a bespoke but more importantly fitting hood frame for his Vitesse!
Great stuff, my junk is useful after all! The best bit came when I was assessing the storage up in the loft and realised I had a set of decent 13" tyres up there - I think they came off my old Vitesse but I can't really be sure - there was one brand new tyre, one that looked like it could only have done 50 miles and two part worn ones.
Why is this relevant I hear you mumble? Well because outside sat on a flat tyre is my daughter's hateful little Corsa. I had noticed a deflated tyre a few days previously and upon closer examination I wasn't happy with the state of the sidewalls on another of her tyres - it's a 10 year old car and although low mileage it looks to have lived outside all it's life - the tyres were all showing signs of cracking. One was particularly bad.
Anyway, quick check of the sizes and yes, spot on the same as Vitesse tyres - 165/70 x 13 - ideal! So off to my favourite little garage for a quick swap around. It wasn't quite as cheap as I remembered and in the last 12 months their costs for mounting a tyre, new valve and balance has near doubled. Still fifty quid for what is effectively 2 new and 2 nearly new tyres is a bargain - for my daughter - she paid :-)
The big bonus is that I have used some spares, made some space and saved some money. I can also constantly remind her that her beloved Corsa is on "Triumph" tyres.

Turned out nice again :-)

Wednesday, July 01, 2009

Under pressure

The PI piffling continues in the heat - great for vapourising all the spilt fuel just hope no one lights up nearby or it's instant BBQ!


I never knew there were two types of pressure relief valve - the long ones are easily dismantled and examined but the short one is a bit of mystery to me. The brass piece is just a 3 way, the next segment is just a housing for a mesh filter, the actual PRV is in the end. On the short one looks to be very similar to the normal long type but I can't see how to take it apart. Never mind, I'll see if it works and adjusts OK. I'll have to use the car as the test rig as I haven't built a bench test rig yet.

I have now been through my stock of pumps and tested every one on the car. Which one is the best? Well would you believe it, the KMI one that wouldn't run and I took apart and cleaned! All bar one actually pump, 3 have failed shaft seals so they piss fuel out of the tell tale and one just won't hold a constant pressure as it over heats within 5 minutes and screams like 12 year old at a Jonas Brothers gig.

That leaves me with the pump that won't make 106 psi for long enough and the KMI one I "refurbished" as the only serviceable ones out of the whole lot! Proof, if proof were needed, that you can't buy anything decent for less than a tenner - well I guess you could say that the KMI pump cost me fifty quid and came with a load of spares :-)

So, the quest is on for seals and I'll refurb them all (maybe the one with the broken magnet might be last, not sure about that one.)

I started to look into whether I could get some shaft seals, I found them quite easy, it's part number 517419.

Prestige - £8.95

Rimmer's - £10.29

Witor's - £9.95

Canley Classics - £7.35

As far as I can tell all the seals, brushes, "o" rings etc are available, Rimmer's do a kit which appears to contain all you need for just shy of £40.

I think I'll get on the blower tomorrow and see what I can rustle up, I've got 5 pumps to build :-)

Pump it up

I'm Jason and I have a problem.

I buy "bargains", you know the sort of stuff, £0.99 on Fleabay and I'm there, "click" and it's mine!
So, armed with that "skill" I find myself sat in a hotel room in India, with nothing but a mini bar and a laptop. You know the routine, drink, eBay, random clicking, box of busted PI pumps is mine for a fiver, delivered.
So I get home to be greeted by piles (and I mean piles) of various eBay purchases and they get stacked in the garage.
The intention is to learn about the things, figure out what wears, what can be refurbished, what new parts are needed and how to test the finished item.
This week I am on a "use it of lose it" holiday at the end of our holiday year - no one else is off and I can piffle in the garage,
I am now surveying my vast stock of pumps - I've paid no more than a tenner for most of them and the vast majority were less than that. Some came with mounting cradles, pipes, pressure relief valves, filters, etc, etc. I've got a KMI re manufactured unit (interestingly it's got a big sticker on it that says it must be fitted with a cooling coil, it was), one that has been DIY refurbed to an amazing standard (and came with loads of parts thrown in by the seller) but most are just standard second hand pumps.
So I took a couple that didn't seem to work when voltage was applied and started stripping. First off is the pump body to see if that's seized. The KMI one was solid but a little percussive maintenance fixed that and it turned. The KMI motor was filthy inside and so I got my newly acquired ultrasonic cleaner on it - pretty good result. I cleaned it all out and reassembled just to see if it would run again - yup!
Next off was one of the grottier looking pumps, I remembered to take a photo of this one, you can see the kind of thing that greets you inside.

However, it too cleaned up OK and ran when reassembled. This pump will, I fear end up as parts. The shaft seal has gone hard and failed, that means fluid gets passed it and into the motor - it leaks from the tell tale (the brass drain just visible under the base plate in the picture above. It's also noisy and when I looked carefully I could see that one of the curved magnets in the case was broken. A shame really as the rest of it looked OK.

I have some reconditioning instructions somewhere that cover what can be done to the motors to help increase efficiency but as I don't have any sophisticated test kit like a growler I don't think there's much else that can be done.

I need to find a decent supply of seals so I can rework these pumps, I should be able to build quite a few then throw them onto a test rig and run them for 24 hours or so - I have acquired a variable voltage power source to do this. I need to figure out how to put a hydraulic load in the test circuit and sort out the plumbing but it's coming together.

Also in the pile of mail order parcels were things like an electronic pressure gauge, a Moto-lita steering wheel, a rivnut gun, some stainless tubing, some headlight accessories, some pressure gauges, a set of curved sewing needles and piece of ex-Military hardware.

More blogging when I stick another screwdriver in my leg and need to come in for a plaster.

Posted by Picasa