Monday, May 31, 2010

Diving under the bonnet for fun with my horn

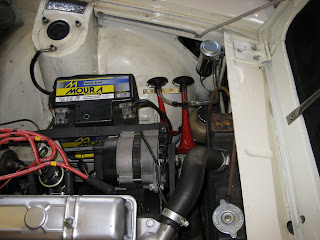
I know, I know, I must stop it with the Carry-on gutter mentality but I watched Carry on at your convenience recently (I'm not really sure why) and it's affected me!

I like air horns, the louder the better. There's something fundamental about a car horn that's been lost over the years. I mean nowadays it's a polite little "peep" in a sort of camp "Yoo hoo!" way. Horns should be loud in a sort of "Oy! Get the *$%# out the way!" style, more of a warning device than anything else.

So I had been looking out for a nice set of Fiamms or maybe some Maserati air horns but these things don't come up too often, when they do they are expensive. I've had a few bids in recently and been frustrated so I just bought some cheapo air horns off eBay and thought I'd fit them up whilst I keep looking for some nice period ones.

So when Tim came over for an afternoon's car fettling he asked what jobs there were to do and, seeing as he could totally see where I was coming from on the whole air horn thing, he decided that would be his task - in no time at they were fitted. Whilst the metal mounting bracket is the best I could find it's not ideal although it does serve a purpose in that it removes the need to drill a hold in the inner wheel arch which I'd rather avoid. We joked about the stingy length of tubing the kit provided but it was enough for a compact installation.

I was always a little paranoid as to whether an air horn would pass an MOT or not so I was going to wire it into a selector switch and retain the standard horns, as it happens we have one standard and the air horns together at the moment. I'll live with it and see how it goes. I'll keep a look out for a better bracket but it's quite solid as it is.

There were a few other jobs to do but one that I'd been meaning to do for a while and kept fannying about over was the fitting of the correct Mk 1 2.5pi under-bonnet sound pad. I'd acquired some stainless steel pipe to make up some better fixing bars and together Tim and I sorted it into two bars, drilled and fitted up with the hard to find but a little tatty fibreglass pad (thanks again Tim).

I had intended to restore the pad in some way but to be honest it's a bit of a nightmare - it's made from what looks like compressed fibreglass loft insulation (aka Rockwool) with some sort of light surface treatment to keep it together. I'd done some experiments with thinned down resin that could be sprayed before curing but how to re-compress the bits that were damaged? In the end we fitted it as it was and it looked OK. However, I then decided that at the least I could give it a light coat of black UHT paint to make sure it was all one colour and I'm glad I did, here's the result which looks really good in the photos.


I'm indebted to Tim for coming round and getting stuck in, I've been spending more time in the garage and enjoying working on the car again after far too long of not getting anything done.

I also managed to change out the fuel pump, sort out some wiring in the boot and build another fuel pump yesterday.

Although only small jobs it was good to have someone to blame for when things didn't go to plan.

Sunday, May 30, 2010

What a stud - bigger is better

Now then, this posting can be read in a serious voice or you can put a Frankie Howerd voice on and insert as much innuendo as you can handle - oooo missus!

It's always been a concern of mine that with the Stag brakes (and some spacers to clear the brake drums) my rear wheel studs were not showing through the nuts. I was not hugely concerned because they are long tube nuts and as such there was a lot of thread to them but I always feel more comfortable seeing the stud in the nut.

It's always been said that Ford studs would fit and after some consultation with the oracles on the Club Triumph Forum (thanks Andy Thompson et al) it turns out it's Ford RS2000 competition studs that are needed. A trawl around eBay and other sires revealed a huge difference in price for what is a fairly cheap component. In the end I got them from these guysMtec Racing Services for a very modest £1.40 each. What you need are Ford Wheel Stud 7/16" UNF 55mm long (there are other lengths available) this means you keep the imperial thread and so can use the same wheel nuts - my nuts are open tube nuts so I don't have to worry about the stud hitting the dome of a domed nut.

I fitted the rears without too much trouble, they are a straight swap - there's a bit of fiddling around to get them in but I managed in the end with thoughts of those Christmas cracker bent metal puzzles that seem impossible until they come apart in your hands with no effort whatsoever!

The fronts were not so easy. OK so there was no dismantling to do and they studs are just long enough to fiddle in but there is a problem that I'd never thought of - the front and rear studs were not the same! The fronts are a bit shorter but more importantly and fatal to my application, is that the shoulder is lower. That means that although the long studs will go in and although I could get the wheels on nuts on, I could not tighten up the nuts. They were bottoming out on the protruding shoulder before the wheel was tight. If I put spacers on the front or turned down the shoulder on a lathe then I might get them on OK.


The photo above shows, from left to right, Front, Rear, Ford.

The answer? Well one answer anyway,stick the Stag rears in thee front and that's what I did. It's not ideal as they aren't as long as I'd like but they are better than the originals.

I forgot to take a picture of the rears but below is a front wheel as was. No sign of a stud in the nut. The nuts, being tube nuts, go right inside the wheel. This means it 's a real pain to refit the wheels as you have to get the stud central whilst supporting the weight of the wheel then fit the nut which is a tight fit in the wheel!
Now here's the view with one ling stud, as you can see it was long but look at the shoulder.
Below is a picture of the wheel over the new studs - originally there would have been no stud showing at all. This is a rear and has wide track Stag suspension and brakes plus spacers to clear the Stag drums. I had to grind off the cast in lettering on the drums to get the KN Gemini wheels to sit right.

and finally below is the finished article, new studs and original tube nuts (with washer) that I have never seen anywhere else and am a bit frightened of losing/wrecking because finding new ones could be a pain!


I also managed to reseal the exhaust silencer and the bendy bit that goes over the driveshaft, this was just a jointing issue and wasn't really a problem just a minor annoyance.

I've got a few other bits and bobs to do in preparation for the International Autoecosse next weekend and Tim Bancroft is coming over for mechanical and moral support. Nothing major just some electrics, cosmetics and audio (no, I'm not fitting a stereo).


Sunday, May 09, 2010

Big knob bad, small knob good

It's been a while since I did anything frivolous on the PI, mainly because it's been rather annoying in resisting all my attempts to get it running right. You see I made a little mental pact with myself - get it running right, move it towards it's potential. Then, and only then, can you start doing all the other jobs that you have stacked up for it!

So it is with some relief that I think I have cracked it this weekend. I have spent two days on the car and been through it step by step.

First a bit of history - it was running OK, then it developed a persistent misfire that you would not drive through. At this point everyone will be blaming the PI. I have installed an electronic fuel pressure gauge in the car so I can see when fuel pressure drops. Yes sometime it has occasionally dropped (I have had several pumps on it testing and developing) but the low fuel pressure misfire is very different to an ignition misfire.

So I had swapped out plugs, leads, cap, rotor arm and coil for a known good one. I'd gone from points to electronic ignition and back again. All to no avail, so pissed off was I that although I drove down to the Isle of Wight, I refused to use the car on the Saturday drive out.

As can be imagined, it was grim determination that I set about the car on Saturday. I'm pleased I did and I'm also pleased I don't make my living doing this sort of stuff because by Sunday morning I'd made no progress whatsoever! I'd put it back on points and then when trying to time it up found my strobe light had died - annoying or what. I got it running and it was, as my erstwhile friend Dave often says, running like a bag-o-shite!

One of the annoyances about the car is that the dizzy is misaligned and the vac unit points into the head making it impossible to pull all the plugs. I decided, pull it all off, dizzy, metering unit , dizzy drive and rotate the oil pump so that I can reassemble the correct way. This means starting a fresh with all timing (ignition and injection)

This morning I swallowed hard and off I went. It took me ages, assembling and reassembling, making and wrecking then remaking the pedestal gasket because I had none. Realising that now was the ideal time to change the choke cable for a NOS one I had acquired - it's a nightmare to attach it to the metering unit in situ but a breeze if it's in your hand. In doing so I realised that the original choke cable was a little kinked and wasn't allowing the over fuel lever to return to closed - it now does.

So I got the Metering Unit timed in OK, got the dizzy mounted then spent the next few hours trying to get the theory of what goes where into practical application - I don't know what happened in my head but I just kept screwing it up. Over and over until I was just about ready to hit it with a hammer and walk away. Then one last time and with a fading battery from all the turning over to no avail, I was ready for the triumphant return of the PI - yes! It only bloody fired and sounded good.

I had bought a brand new coil (Lucas sports) and it had seemed a good time to throw that on. Whilst I was at it I thought I would check and adjust the valve clearances, the car had sounded a little tappety. It needed some adjustment, not much but most were sloppy.

So the only component that I changed today was the coil - could the old coil and the known good one I was using both be crap? They were both the correct 12v coils (no satanic ballast resistors here). I tried the old coils - all fine!

I even managed to appease the Gods somehow and they fixed my timing light which worked at the first attempt. Timed up and running nicely I then went for a blast down the road, it felt good. I drove home and popped the bonnet to admire my work, the engine sounded a bit chattery, something wasn't right. I got my American "Mechanics Stethoscope" out (Thanks Bill) and narrowed it down to the dizzy, it sounded like a bad bearing. Not much I could do about it now I thought. Let's check the vac readings, make sure the engine is as healthy as I think - pulled off the vac tube on the dizzy and stuck it in my gauge.

Hang on!

The noise has stopped! Re-attach the vac advance and the noise is back. It's definitely something to do with the vac advance unit, what I don't know. I pulled the cap off and checked for any fouling of wires or anything obviously loose. The only I can think of now is that whilst I was assembling the points I thought the cheese head machine screw that hold the points on was a bit long (but it's the one that came with the car). I think I'll try the electronic ignition back on again next time I fiddle.

Anyway, vac off let's got for a blast - ooh now that is nice. Pulls well and feels strong. I'm a happy bunny.

As for the title of this post, I bet you're wondering what all this has to do with knob size. Well let me tell you, as a Mk1 owner I have been trying to get all my dash knobs to match but the choke cable knob has never been right, always twice the size of the other knobs - Mk1 PI choke cables are not common on the open market. Now, with the new choke cable I got a choice of two small knobs in the Stanpart bag. So I used the correct one and all is well with the world, I am small knobbed again and proud of it.

So other jobs to do are now looking possible, that is now that the car is running well. On the list are:-
  • Replace the leaky seal in the fuel pump - I must have put an old pump on in my haste
  • Fit these longer Ford RS studs I've just bought so there's some thread showing through
  • Repair the passenger seat, the seam stitching has let go completely now
  • Fit the air horns I've had on the shelf for 3 years+
  • Fit the HID headlight upgrade I've had on the shelf for 2 years+
  • Fit the underbonnet sound pad with these nice stainless retainers I've had for a year
  • Stop making lists

Wednesday, May 05, 2010

Epilogue to the event WCR40

Ted Taylor's written a very nice epilogue to the WCR40 show where he name checks those who did so much to help out and make the event a success, read it here
Epilogue to the event WCR40

There were so many that make the whole event work and I'm sure we've missed a few out but you know who you are and your time and effort was vital.

I would like to say thanks to Ted himself who, through enthusiasm, hard work and perseverance got the job done - we did have a few doom and gloom merchants who told us we would fail and that we should have started 12 months ago etc, etc. It was Ted who didn't listen and just ploughed on. I have to admit, I for one was very worried about letting anyone down, with work and homelife to balance as well as a personal obsession it was always going to be tricky. In the end the cracks didn't show, no one saw the things that went wrong and we all had a good day.

So thanks Ted and Team!

Now, photos. Please, please, please do make them available to me, I'm going to create a new Picassa album for the day and share it for all to see via my own blog and the WCR40 site Gallery. I'll credit any photographer in the album but please be aware these are for public viewing - I'm interested in making the event come alove for the overseas fans who could not make it - and I know there are lots of you because you write to me (which by the way is really good, more please!)

I'm also going to put together a list of the films we showed and try and see if I can find out how you can get legitimate copies. I know that the Cal Withers film is now on DVD (we showed a little at the very start but because of audio visual issues we couldn't interrupt the schedulled show). This hasn't seen the light of day for 30+ years and I haven't seen it all. My own copy is on it's way to me now so I'll report on the full item soon. Ian Harwood is collating orders so drop him a line if you're interested, they are £22 each inc UK postage.

Tuesday, May 04, 2010

WORLD CUP RALLY 40th anniversay souvenir programmes

WORLD CUP RALLY 40th anniversay souvenir programme on eBay (end time 30-May-10 11:54:37 BST)

For those who couldn't make it to Gaydon last month, the souvenir programme is available for purchase from eBay (and also the 2000 Register club shop).

Price is £5.00 including UK postage

For overseas buyers please ask for a shipping quote, it will be at cost price.

Paypal can be used to complete the purchase.

The progamme is a decent read and keep item with a lot of colour and detail. Huge credit to Kevin who put it all together and produced it on time and within budget.

This is our main money maker and whilst we don't seek to make big profits we do need to cover our costs. It would be great to get a few quid in the kitty to enable us to consider putting on another Classic Rally cars event sometime in the future.

Once again, thanks to all who attended or helped in some way.