Saturday, June 30, 2007
A mixed bag of jobs including an uninhibited overdrive
Not a good thing - reverse overdrive is a sure fire way to go pop!
It happened on La Carerra Caledonia, or rather I noticed it happening. Having now taken the tunnel out I can see what I'd done - it was never going to work properly as I had wired it up wrongly! How the hell I did it I don't know or why. Oh well, a simple case of pull off one wire and replace it in the right place, test and it's done.
Then I notice that the nice Aeroquipe clutch pipe I made is damp, with clutch fluid! Damn, check reservoir - nearly empty! OK, one to fix ASAP - it's silicon fluid so it doesn't do any damage but it's an expensive leak.
Now for that intermittent starter issue - turn the key and nothing, no click. You have to wiggle the wires to get it to work. I thought I fixed i a few weeks ago when I spliced in some new wire but it's back.
It's not a standard Vitesse starting circuit so I need to figure out what does what. It's aTR6 pre-engaged starter with 3 wires
Red heavy gauge direct from battery
White/Red to the solenoid on the starter
Brown to the starter
What's the brown one for??
The white/red wire is the "starter wire" and energises the solenoid
The thick red wire is the supply from the battery
The circuit is completed by earthing through the engine
so what's the brown wire for?
I'm taking the starter out and will be doing some bench testing to see what's happening
I've got new headlights and bulbs to fit plus some weather strips and a new 45 amp alternator plus some other odds and sods including wheel bearings but I don't think I'll get those done today.
Friday, June 22, 2007
Non-Triumph but Blogger specific
Often these things get dismissed as Internet Myth so I followed the trail and verified the story - click the links yourself. It's great stuff - all for the sake of an empty box!
May 25: Blogger Terry Heaton bought a digital camera from the US store's liquidation sale only to find out at home that it was empty box. Let's recount the series of events:
June 2: Terry posts on his blog the response he got from the CEO's office about his empty box problem. A CompUSA agent tells Terry that he should have inspected the box before taking it home and all sales are final. Never mind that Terry was a longtime CompUSA customer and had spent $3,500 that day at the liquidation sale.
June 3: The Lost Remote blog writes about Terry's story. 211 people comment.
June 4: The story is posted to Digg where it's digg'd 2,607 times with 210 comments and rises to the number 2 story in the Digg Business section.
June 4: The story hits the front page of BoingBoing (a very popular website).
June 4: CNET.com mentions the story in their video show "The Queue."
June 4: Over 50 blogs write about Terry's story.
June 5: Terry finally gets a call from CompUSA apologizing for the situation and promising a $300 gift certificate from the store.
June 5: Terry's story is on the front page of FoxNews.com, with the caption "Image problem for CompUSA"
June 5: CompUSA realise the gathering firestorm. CEO attempts to defuse situation by offering Terry cash instead of the gift certificate! Terry accepts but by now the spread of the story is out of his hands.
June 6: Picked up by many of the world's most popular blogs. Front Page of BusinessWeek Magasine. CompUSA share price starts to slip - 15% in 3 hours.
Emergency board meet called at CompUSA.
Sunday, June 17, 2007
I've been shopping again!

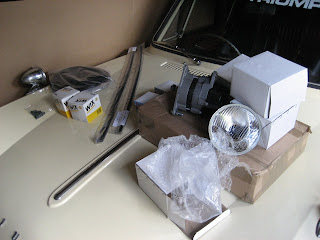
So here we have, in no particular order, a 43 amp alternator for the Vitesse - with that PI pump and 100w headlamps plus all the other odds and sods there's quite a draw. We experienced some weirdness on La Carerra with the power outlet for GPS and phone charger etc - it has some electrickery that turns output off is input falls - seems when we had everything on inc wipers and blower fan, the outlet would turn itself off! Hardly confidence inspiring. With 10CR on the horizon we will need all the electrical power we can muster.
Also in the pic are the new outer weather strips and clips for the doors, fed up with the rattling windows! Also a new boot seal, the old one has finally given up and disintegrated.
There's a couple of fuel filters for the PI - I have some US sourced chrome Hi Flow filters to try also but the ones in the pic are just standard ones.
A pair of front wheel bearings - a previous owner had renewed one side and assembled the bearings with the felt seal facing the bearing. This leads to it being chewed up but the rollers. The other side was correct but the felt seal had worn badly. The felt seals are crap, even when new - there is an alternative. Leon wrote to me from the states to say he's found some "nilos" seals that are the dogs danglies - having had a search around I can see that there would appear to be superior to the felt in every way. No idea of price yet or indeed whether I can get them local or will have to get them from the States. I'd never heard of them before - anyone else heard of them? I found this with a quick Google
Not in the pic are a pair of new discs for the wife's car, that was the advisory on the MOT. The disc weren't great when we got the car but they work OK, just a bit frilly. A new pair of solid discs are an easy cheap fix. I run solids on the Vitesse as well, now without dust shields - they seem OK, never faded them yet. They must be about ready for some new pads - I have some on the shelf I think, some nice old asbestos filled ones :-)
Finally, the "bargain" well not really! I wanted to find some RHD headlamps that would take the H4 P43t bulbs I already have and keep the LHD P45t set for overseas work - although as I have loads of nice high power P43t bulbs I may just keep them in, including some rather nice ice blue 120w ones! Anyway, I've been watching eBay and saw a guy selling all sorts of cheapo headlamps so I took a punt and asked him if he had any 5 3/4 inch headlamps as I needed 4 - of course he did and they were mine for £20 plus a tenner to post them. So, not expecting great quality I thought what the hell, I bought them. Yes they are no name made in India and don't look the best of quality but they are what I needed and have the sidelight bulbs already inside. Not much use but at least the sidelight bulb being fitted means you don't have an open hole in them!
I have another set of RHD flat Lucas 5 3/4 lights that take the P45t bulbs - these are some ex-military things, packed to withstand a nuclear war! One seems to have been removed form the packing and left in the stores like that so it's a bit "shop soiled". I'm not sure what to do with these, I think I'll keep them as they are nice quality.
And finally, not in the pic is a new steering coupling to cure what seems to be the start of a little play in the steering.
Well the shopping was the easy part, gotta fit them all first - mind you , gotta clean the car soon, it's still covered in La Carerra crap. That reminds me, I took the front sticker off, must go out and do the back one now.
Friday, June 08, 2007
Worried about your trunnions? Relief is to hand!
It's a well know fact that the small chassis Triumphs have some design frailties. One of the more spectacular failures you can suffer stems from the front trunnions. When you get a failure here you can loose a front wheel - this isn't a good thing. Often incorrectly known as "trunnion failure" what actually happens is that the vertical link that sits in the trunnion snaps - it does this for a number of reasons, lack of maintenance, fatigue, corrosion, previous trauma, bad luck.
Most often it's the nearside that goes, it's the side that takes all the hammering as you drive over drains in the road in the gutter. It happens when you put a lot of strain on the vertical link whilst maneuvering, say parking the car or turning sharply, or hitting a big pot hole. I've heard of it happening on a slip road or exit from a roundabout, it doesn't usually happen on a straight road and mercifully not usually at speed. However, these two failures below show you what can happen.

The one above happened on the Isle of Wight in 2003, I rescued the driver and his wife from the roadside and I took this picture. The damage to this lovely Mk3 Spit was minor but it was only luck and driver skill that saved them from the oncoming traffic. It happened on a narrow straight road, there wasn't an obvious reason for the failure. The car was repatriated and then repaired in an afternoon. It had not been neglected or abused. The chassis damage was minor, the damage to the bonnet annoying but the owner could and does live with it.

The one above happened earlier this year, on the M1 roundabout slip, smooth road and not a high speed. Again minimal damage and repaired quickly. You can read about it at Jony5's blog.
So how/why does it happen? I hear you ask (yes I am that powerful, but I only use my powers for good)
It's actually the vertical link that's "at fault" here - it screws into a brass trunnion which has a rubber collar seal on it to keep water out. The vertical link is hollow - i.e. it has a drilling up the centre of the thread so you can pump EP90 gear oil down it via a grease nipple screwed into another drilling in the vertical link - in theory this oil injection expels water and dirt as well as lubricating the trunnion. Each side is handed so there's a left and right thread - as you turn the steering it winds up and down the thread. Neither trunnion nor vertical link can be swapped from side to side.
There's debate over whether you should use grease or not, I won't get into that but the manual says gear oil and that's what I've always used. Trouble is, if you neglect them or the previous owners have neglected them, then you may have a latent problem. Water sits in that collar seal right at the base of the thread and can corrode the vertical link at it's narrowest point. The pits from the corrosion create a point for stress cracking often called a "stress riser".
When these Triumph designed front vertical links or front uprights as they are sometimes called, were used in single seater racers of the 50s, they used undrilled vertical links. Race car builders considered them stronger. The drilling takes out only a small amount of metal but it is a weakening factor, it's kind of ironic that the oilway is there for maintenance yet introduces a weakness.
So how can you stop it happening? Maintenance and frequent inspection/ replacement of the vertical link. The trunnion itself isn't really an issue, they are softer (brass) than the vertical links and wear quicker. Usually the vertical link wears with them, but not to the same extent. Examine the threads of the vertical link and especially the collar area at the base of the threaded part - clean the oil, grease, crap off and have a real close look. Corrosion pits act as a stress riser so if you've got a rusty one be aware that it's a weakness and consider replacement. They are handed so you need the correct side.
Personally I am always careful with vertical links of unknown heritage. The six cylinder cars have more weight up front and a slightly different design vertical link but the problem remains - of the two examples above, the white Mk3 is a 4 cylinder, the yellow Mk4 is a 6 cylinder PI car.
Now there is another way :-)
For a long time now the Triumph front suspension has found it's way onto all sorts of kit and sports cars. Look under a 3 litre Marcos and you'll find Vitesse front suspension. The trunnion/vertical link set-up has actually evolved quite a bit in some applications and one of those evolutions is used on Caterham cars. However it's never been a direct bolt on to a stock Triumph owing to the evolution. Now Canley Classics has commissioned two new sets of suspension to completely replace the trunnion and remove the weakness in the old Triumph design.
Basically there is now a stainless steel and teflon coated spherical bearing sitting in a specially designed carrier that bolts into the lower wishbone where the trunnion used to mount. In this sits a bespoke vertical link. The vertical link looks the same as a Triumph one but it's subtly different. The first major advance is that it's undrilled, i.e. inherantly stronger - the spherical bearing is maintenance free and needs no oil, so you need no oil drilling. The second advance is that the vertical link doesn't screw into the bearing so it's not "handed" - ie if you wanted to carry a spare as insurance against accidental damage (say on a rally) then you only need one. There's another benefit in that when the spherical bearing eventually wears you just need to remove one nut and one circlip to replace it. Neither the vertical link not the spherical bearing carrier need be replaced or removed.
Fitting is pretty straight forward - the retail kit is supplied assembled as a vertical link, spherical bearing and lower bearing carrier. I renewed the top ball joints too and that made fitting easier but you don't have to do it that way.
You don't need to upset the steering geometry at all - here are the main operations
- Jack up and secure the car, remove the front wheel and caliper - don't disconnect the hydraulics just take out the two caliper securing bolts and tie it up out of the way.
- Remove the disc, keep the wheel bearings safe and grit free, you'll be putting these back in. It's a good time to check the bearings, mine had one of the dust seals on backwards! Felt against a moving bearing - I washed them out and re-greased them. When I reassembled them, I turned the felt seal the right way round.
- Remove the caliper carrier and steering arm - do not disconnect the track rod ends or you'll screw up steering geometry.
- Remove the trunnion bolt - this may be seized. If so, go for your copper hammer - the car is secure on it's axle sands isn't it? Hit it!
- Loosen the lower shocker bolt - don't remove it, this just makes it easier to get the new carrier into the lower wishbone.
- Remove the two bolts securing the ball joint to the upper wishbone, if you don't want to renew your ball joints you will have to separate it from your vertical link, there's just one nut securing it, you may need a splitter for this. I took the opportunity to replace my ball joints.
Now you can reassemble with this
What's shown is what you get in the kit PLUS a balljoint. Click on any picture to make it full size.
What does it cost? The six cylinder kit is Canley's Part number CATKIT1, retail price (inc VAT) is £235. That's for everything bolted together, both sides i.e. the carrier, bearing, circlip, lower nut and the vertical link.
The four cylinder kit is CATKIT2, same price.
Top ball joints are about a tenner each
The system can be ordered on the phone only at the moment, Dave's yet to update the web pages so give Claire, Phil or James a call at Canley Classics (don't bother Dave, he's too busy developing more new stuff!).
Dave will fit it for you, contact him direct for a price and availability in the workshop.
The parts will not be sold separately, spares will be available to people who bought the full kit.
There is limited availability for the 6 cylinder stuff at the moment. That will improve when the next shipment of vertical links comes in from Elbonia but they will need machining, etc.
You can't use your old vertical links and you can't mix and match the new stuff with a trunnion or anything silly like that!
If you were daft, you could run a trunnion set-up on one side and this new one on t'other - Canley's did whilst testing it for a year.
What does it look like fitted?

What does it drive like?
It's pretty much unnoticeable - I've just done 1300 hard miles on them in a weekend and the car just feels normal. They are unremarkable, as they should be.

Worth the money?
Well you decide, I'm just reporting the facts. Having seen the aftermath of failure I am happier to have them than not. Replacing like for like a pair of standard vertical links, trunnions and trunnion bushes with nuts and bolts etc is about £35 cheaper so the extra piece of mind is well worth it to me.
Thursday, June 07, 2007
This list grows shorter already!
One of the main annoying problems was the temperamental starting - occasionally you'd turn the key and nothing, just the whir of the fuel pump. No click just nowt!
The fix was to get out, open the bonnet and wiggle the red and white wire to the starter, it's a TR6 pre-engaged starter with the solenoid on top.
Towards the end of the run the fault was getting more regular to the point where it happened every time!
The connection to the starter was suspect but this turned out to be fine, on closer inspection there was a split in the insulation and the wire felt weird, well crispy.
As I stripped back the loom and cut back the insulation is was clear that moisture had got inside and corroded the copper strands. I stripped it back a few inches into good clean copper and renewed the Lucas connectors.
I tidied it up a bit with a cable tie to made sure the cables couldn't touch the steering column or the hot exhaust manifold.
With starting sorted I've just got the other jobs to do now, in no particular order
- Dry it out! The rear foot wells got very wet overnight when the car was parked at an angle to the driving rain!
- Have another go at that grating noise - means more prop alignment!
- Service it - top up the oil, change the filters - fuel and oil. Take a look at the breaks and adjust the rears, grease anything that moves.
- Try and improve the door seals, it's very draughty - OK this is a bit of a tall order on a Vitesse convertible!
- Fix the overdrive inhibitor so overdrive won't cut in on all gears! Overdrive in reverse is terminal to the uni-directional clutch in the overdrive!
- Change the front wheel bearings - they were OK but one felt seal was on backwards and on the other side the seal had disintegrated.
- Fit 3 K&N filters in place of the standard "log".
- Improve fuel economy - I'll do some proper economy runs first and see if I can get a decent return with careful driving.
- Sort out the electrics, the 3 socket cigarette lighter type socket I installed seems to have some sort of restriction in it - if you put the lights and wipers on, it won't work - turn them off and it does. It has some sort of circuitry that turns it off when the voltage drops - is my alternator working properly?
- Replace the bonnet catches with a couple of new ones I have "in stock" - the current pair are rather owrn, one works OK but the driver's side is stiff and worn out.
- grease the door hinges, driver's door groans a bit
- Wash and polish it :-)
- Fix the bonnet front panel, this isn't a LCC issue, it's been like that for ages, need a bit of repair and some paint - which means I need to find somewhere to match it.
- Replace the sills - once I match the paint I can paint some new Stanpart sills I have and fit them to improve the looks.
- Touch up some of the battle scars
- Design and have made a fuel tank - I've made a mock up and will continue trying to fine tune it.
Wow! Quite a list, I might print that out and put it up inthe garage!
Tuesday, June 05, 2007
La Carerra Caledonia - been there, done that, got the Quaich

Well we did it, started and finished a CT event in the Vitesse, the demons are exorcised and all is well with the world again!
Above you see the Vitesse with it's badge of shame on the rear flank, a CT RBRR sticker with the "RBRR" bit removed - the crank broke before the car could start the event!
So what was La Carerra Caledonia? For me it was 1362 miles of hard driving and good company. Here are the highlights and a few low lights!
I went up to Canley Classics to collect my co driver, Dave Pearson on Thursday. The usual preparation was done - change oil and filter as the engine had only done 300 miles by the time I got to Dave's and was still on running in oil. I also tried to cure the annoying prop shaft fouling the chassis - sort of improved it but it's not 100%. Whilst the tunnel was out I changed the gearbox oil for my fancy fully synthetic Redline MT90 - seemed fine all the way round.
Secret weapons had been promised and these were a pair of new uprights and spherical bearings to replace the front trunnions. They are a derivative of the Caterham uprights. I'll do a full write up on these in a few days - suffice to say they are stronger, maintenance free and easy to fit - my car is now trunnionless! Pictures and details later in the week.
We were still doing most of this on Friday morning as both Dave and I had "issues" with oil - I managed to drain mine onto the workshop floor having knocked the drain bowl aside as I removed the sump plug! I then made matters worse by adding new oil with the sump plug still out - school boy error or what? Lucky I noticed before I put the whole can in! Dave had a TR6 that he had to sort out, the filter bowl in that just would not seal and it threw out it's oil too!
Friday's drive up was great, right up to the point we lost power and coasted to the hard shoulder, 10 miles from the Pendle and Pennine meeting! We limped it there but the car was not happy - it seemed to be that it just wouldn't run for long before coughing and spluttering, banging and farting - oh, to be fair, most of the farting was Dave.
We had a tinker at the meeting, it was obvious it was running super rich, the plugs were sooted up, I put the spares in. Maybe the air filter was restricting things? I took it off.
We ran up to the start at Gretna and again, no real improvement. It was touch and go but we limped it in. Some head scratching at the start - could it be heat related? Could the new metering unit be seizing up as it got warm? Could it be ignition! Coil breaking down?? Dave Langrick produced a coil, we zip tied it in place and plugged it in, we were running out of ideas. We actually did the whole event with the coil zip tied on and no air filter as it was too wet to be standing around outside to change it.
So we set off with the car popping and banging and shooting the odd flame. About 15 miles down the road we pulled in as it died once again. We just could not get it running right again - 12 inch flames out the back nearly toasted Dave Langrick's car - he'd pulled in behind to offer assistance. We waited a while, cooled the MU down with some water and checked plugs (black and sooty) - we took off again for one more attempt to get going but it wasn't long before we were in a lay by again.
This was one of those low points where you just feel miserable. Nothing you do seems to matter, it defies logic. Then you start to think about recovery options, we were about 20 miles West of Gretna Green in the middle of not a lot, that's near to the middle of nowhere but not quite! I had sent a text to Gareth Thomas on the off chance he was able to offer some advice - fair play too him it was a Saturday and he called me, very concerned and very helpful. He was in Devon so not too good for hands on action. We started going through the symptoms, could the MU have failed - everything pointed to a fault with it. He was reluctant to encourage us to start taking it apart as it was under warranty but when you're on the side of the road in the middle of an event you gotta do what you gotta do! We'd already had the side cover off (no mean feet in the restricted space a Vitesse offers) to check that the vac unit was working (it was) and Dave was about to have at it when Gareth asked whether there was much spill back from the MU - Dave had the pipe off and there was the normal amount.
Then Dave noticed it, the pipe was blocked - it was hard to see how but the pipe was definitely blocked - Dave hacked it off with my penknife and re-fitted it. The car started and ran badly for a while. We thought well lets try it.
If the spill is not allowed out of the MU pressure builds up inside and can force the shuttle into the rich position or at least restrict it's movement. This could be the cause of our problems. We then gave the car some serious maximum attack driving to get back on the route. It was clearing and things seemed to be better, only time would tell.
We had waisted far too much time we thought, we were amongst the last to start and had been roadside for probably the best part of an hour or more. We picked up the route but thought if it isn't fixed we really could be with being somewhere where we could fix it so we decided to cut some of the more remote parts of the route and head straight for Ayr - if the car was OK there then we could re-join the route and carry on. If not, well we'd worry about that later!
We drove the car hard, it responded well! Confidence was restored and we pushed on.
We were without incident and arrived at Arrochar ahead of most of the field, it had been a day of highs and lows.

The above pic is the car on the Rest and be thankful rally stage, a little sideways on the exit from the hairpin. Sorry the shot's a bit shaky but I was stood in front of it at the time! Dave was driving, I'd had an earlier run and was still smiling like an village idiot.
Day two was wet, damn wet - all day! Luckily I had, after 2 years of bodging through the MOT, replaced the wipers with new ones - bonus, they were just crap now, not useless as before :-)

We really enjoyed the run up to Aviemore, there were some great roads, a highlight for me was the last 30 miles in, a glorious third/third overdrive winding up and down, hairpin and blind summit road that ended up going through some semi wooded riverside scenery. We were on our own, no traffic and it was great, I was enjoying it so much that I failed to notice Dave sat next to me had forsaken the maps. "Where are we?" I asked him, "I dunno, I'm too scared to look at the map!" he replied.
And then we were there, at the end for much beer and chat - tales of moments and offs, mechanical maladies and moments of stupidity. Exhausts lost, paint work and egos bruised, misfueled cars and of course our own 12" flames but the end result was a load of contented crews in cars they love. It's an event I will definitely do again and if anyone reading this is thinking of a Round Britain - do LCC, it half a Round Britain with beer and beds.
Stats for the crew, all are approximation or blatant lies
1362 miles driven
65 Gallons of fuel used (gotta work that out properly)
22 MPG average including producing those 12" flames
Max GPS verified speed before the driver ran out of bottle - 107 mph
Max unverified speed as the GPS packed up - 115 mph
Happy cruising speed 75/80 mph - the car feels stable and unstressed
50 pints of lager/beer drunk
2000 litres of methane produced
Just the jobs to do list next :-)